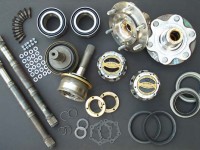
ORS-HB051/HB052/HB053
NOTICE: It is highly recommended that a qualified technician install this kit. Special tools/equipment are required for the installation. Experience with these procedures, particularly pressing wheel bearings, is highly recommended. Improper installation will void the warranty on these parts; this is the responsibility of whoever purchases this kit. This kit does not include lockouts (manual hubs). The following hubs can be used: Warn, Milemarker, or Asian. Applications for Tacomas with original manual hubs can only be used.
NOTICE TO CUSTOMERS USING A LIFT KIT WITH NEW, UPGRADED STEERING KNUCKLES – TALK TO LIFT KIT MANUFACTURER BEFORE INSTALLING THESE PARTS. Due to imperfections in the after-market knuckles, there is a shim that sometimes needs to be installed in between the hub and bearing to prevent the outer seal from binding on the wheel hub. Some manufacturers may tell you these shims are only needed if you press the hub too far into bearing, which is untrue and impossible. These shims are available from the lift kit manufacturer. If the hub parts are assembled before realizing the need for these shims, new wheel bearings would be needed after pressing the hub out of the bearing to correct the situation.If the lift manufacturer has these shims and claim they are only needed at times, we recommend using them anyway to prevent the need for a second set of bearings.
KIT CONTENTS:
- 2 x Hub assembly
- 2 x Axle shaft
- 4 x CV boot clamp (long)
- 4 X CV boot clamp (short)
- 2 x Toyota wheel bearing
- 2 x Hub gasket
- 2 x Outer CV joint
- 6 x Grease packs
BAG 1:
- 2 x Lock nut
- 2 x End snap ring
- 12 x 8mm nut
- 12 x 8mm stud
- 2 x End washer
- 2 x Large snap ring
AXLE CLIPS (pre installed on axle shafts):
- 2 x Outer axle clip
- 2 x Outer axle snap ring
- 2 x Inner axle clip (Tundra)
- 2 x Inner axle snap ring (Tacoma/4 Runner)
- 2 x Inner axle clip (Tacoma)
BAG 2:
- 2 x Dust seal
- 2 x Oil seal
- Carefully read all instructions before assembly.
- New CV boots are an option in the kit. If needed, they can be ordered through Off Road Solutions.
- Raise and securely support the front end of the vehicle.
- Remove front tires.
- Remove dust cap, cotter pin, and hub nut from the hub.
- Carefully remove the 6mm retaining bolt and ABS wheel speed sensor, if applicable.
- Remove the 12mm caliper retaining bolts and the 6mm bolt that retains the brake hose to the knuckle. Securely hang the caliper out of the way. Be careful not to damage any brake lines or hoses. Remove the brake rotor.
- Remove the four 8mm bolts that retain the lower ball joint to the knuckle.
- Remove the cotter pin and 14mm nut that retain the upper ball joint in the upper control arm.
- Using a proper puller, press the upper ball joint stud out of its taper.
- While sliding the axle out of its splines, remove the knuckle from the vehicle.
- Remove the large seal from the inner edge of the knuckle.
- Using the proper press tools and hydraulic press, press the hub out of the knuckle, towards the outside of the knuckle. In order to prevent knuckle failure, it is very important to properly support the knuckle.
- Drive the wheel bearing back in its seat towards the inside of the knuckle.
- Remove the dust seal from the outer side of the knuckle.
- Carefully remove the large wheel bearing retaining ring. Note: if the retaining ring cannot be removed, drive the wheel bearing further into the knuckle.
- Note the orientation of wheel bearing in the knuckle.
- Press the wheel bearing out of the knuckle.
- Clean out the knuckle and all related parts.
- Pressing against the OUTER RACE, drive the new wheel bearing back into the knuckle using a hydraulic press. Be sure to use the proper orientation of the bearing.
- Re-install the wheel bearing retaining ring.
- Carefully install the new dust seal on the outside of the knuckle.
- Coat the inner roller bearing and brass bushing of the hub with wheel bearing grease.
- Support the knuckle/bearing assembly from the INNER RACE of the wheel bearing. Using a hydraulic press, press the new hub into the knuckle/bearing from the outside of the knuckle.
- Install the spacer (no ABS) or wheel speed sensor ring (ABS) into the inner knuckle as they were originally. Apply a small amount of threadlock to the threads of the hub lock nut. Install the new hub lock nut on inside of the hub. The tapered section of the nut will face AWAY from the bearing. Using hub nut socket, torque to 203 ft-lbs. Stake the tapered portion of the nut to the notch in the threads.
- Pack wheel bearing grease on the inside of the knuckle to lubricate the brass bushing.
- Install new dust seal on the inside of the knuckle.
- Drain the front differential.
- Pull the axle assembly out of the front differential.
- Remove the CV boot and clamps from the inner CV joint. Separate the axle from the inner joint. On Tundra models, tension snap ring inside joint to release axle shaft. Note the orientation of all the axle parts for re-assembly.
- On 4Runners and Tacomas remove the snap ring and inner CV joint race from the axle shaft. Note the orientation of this joint for proper assembly.
- Pack new outer CV joint with 1 pack of CV joint grease. Install the new clip and snap ring on the outer splines of the new axle shaft. Press the new outer CV joint onto new axle. Install new or used CV boot and clamps on outer CV joint. Be sure there is sufficient grease in boot and joint.
- Slide the inner CV boot and clamps over the axle shaft.
- On 4Runners and Tacomas install used inner joint race and new snap ring on new axle shaft using proper orientation.
- Pack inner CV joint with 2 new grease packs and slide the axle and race into inner CV joint. On Tundra models slide the axle shaft directly into the inner joint, a new inner clip is provided, but usually not needed.
- Install the inner CV boot and clamps.
- Before installation, inspect differential axle seals for any damage.
- Install axle assembly into differential.
- Installation of the knuckle, caliper, rotor, and ABS sensor is the reverse of removal.
- Be sure to use all manufacturers’ torque specifications and install new cotter pins.
- Install six new 8mm studs into the new hub.
- Apply a coating of grease to the brass bushing at the end of the spindle/hub assembly. Install new snap ring and washer on end of axle.
- Steps 44-45 pertain to installing the lockout assembly. Be sure to refer to the manufacturer’s installation procedures to be sure the right steps are taken.
- Coat all lockout (manual hub) parts with a thin film of multipurpose wheel bearing grease. Using the provided gasket, install the lockout body onto hub. Install a flat washer, lock washer, and nut onto each stud. Torque the nut to manufacturer’s specifications.
- Install the lockout gasket and cover onto lockout body. Install and torque the cover bolts.
- Move the lockout from the “unlock” to the “lock” position to verify that the lockout functions properly.
- Fill differential with 75W-90 Hypoid type gear oil.
- Repeat steps 3-42 for the other side of the vehicle.
- Install and torque the wheels. Lower the vehicle back to the ground.
Contact us with any questions about this product.


