NOTICE TO INSTALLER: Fully read and understand these instructions before starting. This will make the job easier and faster. We promise!
The installation of this product requires fabrication. We recommend that the installer is competent with fabrication processes such as welding, cutting, and grinding. A poor installation of this product can lead to a frame failure.
- Center the steering system of the vehicle, making sure that the tires are pointing straight forward and the steering wheel is centered.
- Remove the key and lock the steering wheel in place.
- Disconnect the drag link from the pitman arm and set the drag link out of the way.
- Remove the steering shaft and hydraulic lines/hoses from the steering gear. Remove the steering gear from the vehicle and set aside.
- We recommend making a mark to reference the steering gear location so that the steering gear is in the same orientation during assembly.
- Move the steering shaft and hydraulic lines/hoses out of the way. Plug the lines/hoses so that they are not leaking fluid.
- If necessary, clean the frame rail around the steering gear mounting area.
- Using a torch or cutting tool, remove the steering stop from the inside of the frame. Use a grinder or sander to smooth the frame surface. Be careful not to damage the frame.
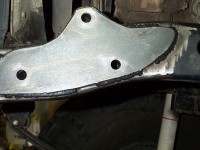
- This kit comes with 2 steering plates. The plate with 2 larger holes is placed on the inside of the frame. The plate with 3 holes is placed on the outside of the frame.
- Place the outer plate on the frame rail, aligning the bolt holes with the holes in the plate. Mark the outline of this plate on the frame rail for reference. Set the plate aside.
- Place the inner plate against the inner frame rail, aligning the large holes over the welded sleeves in the frame. Mark the outline of the plate on the frame for reference. Be sure that the plate sits relatively flush against the frame. Grind down any existing weld that may be in the way. Set the plate aside.
- Using a sanding tool, sand along the marks on the frame to provide a clean welding surface. Remove only enough paint to provide a good weld.
- We recommend applying a thin coat of paint to the rear of each plate before installation to help prevent rust in the future. Be sure not to paint too much as this can cause a defective weld. Be sure to keep the paint away from the edges.
- Drill out the 3 mounting holes in the steering gear to 1/2″.
- Using the provided hardware, bolt the steering gear and outer frame plate to the frame. The shorter bolt is installed in the top hole. Install the washer and lock nut on the inside of the frame rail. Tighten the 3 bolts.
- Firmly tack-weld the outer steering plate to the frame. Remove the steering gear and hardware.
- Place the inner plate against the inner frame rail and clamp into place. Sometimes the inner frame rail is concave. We recommend using a clamp to form the inner plate to the shape of the frame rail before welding. Once the inner plate is properly aligned, firmly tack-weld it into place. Remove the clamp.
- Fully weld both plates into place. We recommend using approx. 2”-3” beads around the outside of the plates. Place approx. 1” gaps between each weld. Be sure to weld the mounting tab for the upper mounting sleeve to the outer plate.
- Once the frame has cooled, apply primer and paint to all bare metal surfaces.
- Install the steering gear using the provided hardware. The shorter bolt is installed in the top hole. Install the washer and lock nut on the inside of the frame rail. Tighten the 3 bolts.
- Install the drag link at the pitman arm and tighten the hardware.
- Install and tighten the hydraulic lines/hoses.
- Install the steering shaft. Be sure that the steering gear and steering shaft are referenced to each other properly. Tighten the steering shaft hardware.
- Start vehicle and check for leaks.
- After a short period of driving, check the torque on the steering gear mounting bolts and check for leaks.
- Congratulations!


