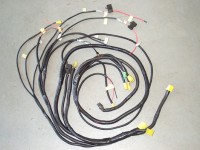
ORS-EC001
’89-’95 Minitruck & ’90-’95 4Runner Donor Fuel Injection
*****NOTICE TO CUSTOMER: If there is a problem suspected with the wiring harness, call Off Road Solutions. DO NOT cut, alter, or dissect the ORS conversion harness. Off Road Solutions accepts no responsibility for a harness that has been tampered with – NO EXCETPIONS. Off Road Solutions will not be willing to repair a modified harness.
Following is a list of parts needed for the Off Road Solutions fuel injection conversion on a 22R engine. These parts must be used in conjunction with the Off Road Solutions wiring harness to complete your conversion. These parts must be removed from a 1989 or later pickup or a 1990 or later 4Runner equipped with a 22RE engine. We highly recommend that all these parts are all removed from the same vehicle.
- Intake manifold *
- Intake plenum and throttle body assembly *
- Exhaust manifold with oxygen sensor fitting (optional) *
- Exhaust manifold gasket
- Intake manifold gasket
- VSV/fuel pressure up *
- VSV/evaporative (optional) *
- VSV/EGR (optional) *
- Fuel filter *
- Fuel filter bracket *
- 2 high pressure fuel hoses *
- Fuel line from fuel tank
- High pressure fuel pump
- Fuel rail *
- 4 fuel injectors w/ o-rings *
- Fuel pressure regulator *
- Fuel dampener *
- Fuel line gaskets
- Knock sensor *
- Power steering pump with vacuum valve *
- Air filter box
- Intake hoses
- Air flow meter
- Passenger side water pipe from timing cover *
- Throttle body coolant hoses *
- Distributor *
- Plugs, wires, cap and rotor * (different than carbureted)
- Engine wiring harness *
- ECU
- Circuit opening relay
- Oxygen sensor
- Power steering reservoir (optional)
- PCV hoses *
- Assorted vacuum hoses (optional) *
- Vacuum hose rail *
- EGR pipe *
- Upper radiator hose *
* indicates items attached to engine
Following is a list of parts that we recommend replacing when doing this conversion. These parts are available through Off Road Solutions or a local parts store.
- Exhaust manifold gasket
- Intake manifold gasket
- Fuel filter
- 2 high pressure fuel hoses
- Injector o-rings
- Fuel line gaskets
- Throttle body coolant hoses
- Plugs, wires, cap and rotor (different than carbureted)
- Any PCV or vacuum hoses in poor shape
- Circuit opening relay
- Any radiator hose or drivebelts in poor shape
The Off Road Solutions fuel injection conversion harness is installed after all conversion parts are installed on the vehicle.
- Be sure that the engine ECU is properly mounted and the engine wiring harness is routed and connected to the ECU. Connect the 2 large connectors on the ORS conversion harness to the matching plugs on the engine harness near the ECU.
- Connect a circuit opening relay (fuel pump relay) to the ORS conversion harness. This is located on the body harness, near the glove box, on the donor vehicle. We recommend replacing this relay. Toyota part # 85910-35010
- Securely mount the circuit opening, EFI, and starter relays in a safe location.
- Route the harness lead containing the check engine light toward the driver side of the vehicle. Mount the check engine light. Connect the “ignition on” signal to a large current ignition source. Connect the brake light switch signal to the switching side of the brake light circuit. The brake signal is not required but recommended.
- Route the lead containing the fuse-holders to the battery positive terminal. Remove the fuses. Connect the leads to the battery positive terminal.
- Connect the ground terminal to a body ground location.
- Connect the starter signal lead to a vehicle start signal.
- Route the fuel pump leads to the fuel pump. Connect the positive and negative leads. Do not connect backwards.
- Connect the lead labeled speed sensor signal to a one wire vehicle speed sensor signal. This lead is recommended but not required.
- The leads labeled tachometer, water temp, and oil pressure are signals for the corresponding guages. Connect these leads to their proper gauge sender wire.
- Be sure that all connections are secure and all wires are routed properly and securely. Be sure that wires are not in danger of heat, exhaust, or sharp edges.
- Install the 2 fuses in their respective fuse holders.
- The wiring part of your conversion is complete!
WIRING SUPPLEMENT
“STANDALONE” CONVERSION HARNESS
FOR ’79-’87 CARB. VEHICLES
- Locate the original Emissions Control Computer in your vehicle. This is normally in the passenger side kick-panel. Disconnect and discard this computer.
- Locate the following wires in the connector to the Emission Control Computer. Cut the wire from the connector and directly splice to the wire lead in the ORS harness according to the chart below.
Emission Control Computer Wire Color To ORS Harness Lead
-Green w/ blue stripe To + speed sensor signal
-Black To tachometer


